Configure Account to Enable Manual Control of Output Relays
- First, the user has to be given this ability by an CSA under manage users tab.
- Under the “manage users” tab, select the user to be given this ability.
- Change the last line on the page labeled “Allow user to manually control relay outputs” to Yes.
- Press “Save & Return to User list” button on bottom right

Controlling an Output Relay
- Once the user logs in the new settings will be available
- Selects the “View RTU Status” tab.
- This user will now have that ability anytime they log in and the RTU is powered up.
- They then select the RTU by name.
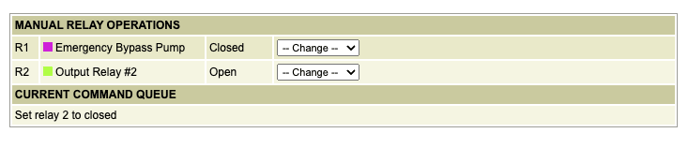
- At the bottom of the page will be the “MANUAL RELAY OPERATIONS” section.
- Both relays are listed with the current open/closed status condition.
- In the “Change” area they can now send a signal to “open/close or pulse” the relay at the RTU.
- The signal will be shown under “Current Command Queue” until the RTU updates the status. This can take a few seconds.
- The relay has now been changed to the new state
- User can proceed to the next RTU and take whatever action they deem appropriate (in the case of controlling multiple RTUs